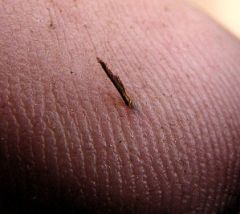
Ouch! Shoot, not again. I got another sliver.
 We all know how irritating and painful a sliver can be, but when you work in the tree services industry, it is unfortunately a hazard that comes with the job. We handle branches, tree trunks and constantly have our hands in bundles of brush. Sadly, a manicure is lost on these rough hands.
So what do you do if you get a splinter in your own hand? Don’t panic! More often than not, small splinters will work themselves out after a few days under their own steam with no after-effects. You could also try applying a little mixture of baking soda and water to help draw out the offending object. Sometimes even applying a bandage or piece of tape for a few minutes, then pulling it away, will see the splinter come with the bandage.
Of course the irritation that a splinter under the skin causes, might have you a little impatient to get it out sooner rather than later. In that case, the boys at CLC Tree Services have had enough slivers that they can practically remove them with their eyes closed. Here are a few of their simple pointers to make sliver removal as simple and pain-free as possible.
Sliver Removal 101
STEP 1:
The first thing that you need to do when you get a splinter, be it wood, metal or glass, is to gently wash the affected area. The biggest concern when you get a sliver is the germs that are on the foreign object, that is now embedded in your skin. The less germs the better!
STEP 2:
Inspect the wound. Is there a large enough piece of the object protruding from the skin for you to grasp onto with tweezers? If so, then gently give a tug and remove the sliver and move to step 4. If not, don’t start sniffling. Move to step 3.
STEP 3:
If there is only a nick of the splinter or nothing at all to grab a hold of, then you will need some tools I am afraid. Grandma was always right with her sewing needle, so go rifle through the sewing kit and get one. Make sure to sterilize it first, preferably with alcohol, then gently pull back the skin from around the sliver. Alternately, use a clean sterilized razor blade to make a small incision parallel to the sliver. Once the sliver is exposed, then remove the offending piece with your tweezers.
STEP 4:
Once the sliver has been removed, make sure to clean the site well with soap and water. The danger with slivers is the germs that enter your body on the foreign object. Infection is a concern, but with proper cleaning a minor sliver should heal with little to no problems. Make sure you apply a bandage to the area once it has been cleaned and dried. And you are done!
Please note:
These steps are suggestions for small slivers that are relatively easy to remove. If you find yourself with a big slab of wood sticking out of you, or even worse, completely embedded with no grip in sight, then perhaps it is best to seek medical attention. If you think that you can handle a little DIY doctoring though, give these tips a try.
REMEMBER:
The best way to avoid slivers is by wearing proper hand protection when handling wood or other splintery type objects. Sturdy leather gloves are appropriate for handling saws, but flexible nylon mesh gloves are great for most other applications. The best way to remove a splinter is to never get one at all!


[…] Read more here: Sliver Removal 101 | CLC Tree Services: The Blog […]
Thanks for the link share!
[…] easily worked wood. Another bonus for the delicate hands of a craftsman is that this wood does not splinter easily, so there is more time to focus on creation versus emergency doctor visits, for those […]